scriptygoddess

08 Aug, 2009

Adding alternate row styles to a table with JQuery

Posted by: Jennifer In: jquery

JQuery's simplicity is so wonderful and powerful. Here's a perfect example. If you have a table, and you want to alternate the row colors. To do so, all you need is this:

$(document).ready(function() {
$("table.striped tr:nth-child(even)").addClass("altrow");
});

Then, just add class="striped" to your table tag, and jquery will automatically apply add the class "altrow" to every other row. (If you want to change which row it starts with – change 'even' to 'odd' in the code above).

Then just include a style for your altrow:

table.striped tr.altrow td {
background-color: #ccc;
}

And to think I used to do that manually. OY!

17 Jun, 2009

WordPress 2.8 Issues

Posted by: Jennifer In: WordPress: Lessons Learned

In case you hadn't heard (and if you're using wordpress, how could you NOT have heard) :) WordPress 2.8 is out. One of the features included in this round was a rework of the way Widgets work – including a easier to use API. In light of this, I made use of the new API (armed with this great tutorial and sample file) and created some custom widgets for my clients.

A few problems:
I needed to use TinyMCE for one of the textareas, (There's some good information here on how to do that) because the client doesn't know and doesn't want to know HTML. Trying to apply TinyMCE to the textarea in a widget presented all kind of problems.

Also – just simply dragging and dropping the widgets onto the correct sidebar was excruciating slow.

The solution to both of these problems was solved in the 2.8 FAQ – specifically – turning on "Accessibility Mode" in the screen options for the widgets page. It's not as snazzy as it was before – but being excruciatingly slow and TinyMCE not working isn't snazzy either. So I'll take "functional" over "Snazzy but not functional".

Anyway – just putting this out there for anyone else running into similar problems.

This is the second time I've run into this problem. I opted not to post about it the first time, because the solution was so simple it was kind of silly. But lo-and-behold – I hit it again and forgot what the solution was anyway. :)

I know there can be more than one thing that causes that "open_basedir restriction in effect" error – but in my case it was because:

1) I was moving a wordpress site to another location (usually a subdomain of a live site so I could set it up as a "test area")
2) In the settings page, I had specified a different path for uploads (this is done on the "miscellaneous" settings page). This directory was actually OUTSIDE of the wordpress directory, which means I had to use the full server path to point to my custom uploads directory…

So I copied over the files to the test area, copied the database to the test database, changed the domain to the test domain using this method. But if you've specified a path for uploads on that miscellaneous page – you'll need to log in once everything is all set up and change the path there too to the new one pointed at the new location.

A recent project I've been working on involved a portfolio page that required a "carousel" type browser. It also needed to have multiple rows (so that images could be grouped into various projects). Also, because this page would contain a large number of images, it was required that the images not be loaded until you pulled up that particular project/row in the carousel.

There are a lot of carousel scripts out there, and there is a scrolling plugin that I had been counting on to help me create what I needed – but to be honest, either I couldn't get those scripts to work the way I wanted them to, or I couldn't get them to work AT ALL. I spent a few frustrating days fighting with the plugins, when I finally threw in the towel. I knew what I wanted to do, and figured I'd be better off hand coding specifically what I needed instead of retrofitting a pre-made plugin or script. It turned out to be less time consuming, and in the end I got exactly what I wanted.

So while this script was for a specific purpose, I thought I would put it out here anyway on the chance that it might work for or help someone else. It's probably possible to "package it up" into a more modular plugin.

So first here is the very rough, proof of concept/demo. (no design on that page – just wanted to show how the script works) :)

Here you can download all the files (except the photos – I originally grabbed them from stock.xchng)

I'll walk through just a few of the details of how the HTML needs to be structured in order to get the script to work – but the files in the zip are well commented and should explain the rest.

One important trick with this script is that there are some "naming conventions" that it relies on. Each row of photos is setup as a unordered list. The ID of that unordered list is used as a base for naming other related elements. So for example – the first row is named with and ID of "row1" – I use that base for the ID of a div that contains links to the images in that row. I want this div to only appear when that row1 is being shown. So the ID of the div needs to be created like ROW BASE NAME + "-nav". So, specifically: "row1-nav".

You'll notice in the HTML when I link to rows or specific images in the row – I didn't put the id of the image inside the "href" element. I actually repurposed the "rel" attribute and put the image I wanted to display in the carousel in that. (The script didn't work quite right if I put the row name in the href value).

Another "repurpose" I've done is for use with the delayed image loading. In each of the LI element, I "store" the path to the image that will be loaded inside the LI element in the "title" tag.

I've pulled out as many "variables" as I could in the javascript.js – row names, image names, classnames – and explained what they are and how they relate to the HTML in the comments to make reusing the code as easy as possible.

So an important note, I don't claim this to be an easy to use plugin. If you're going to use this script, you do have to some level of understanding of jquery, javascript, html. I also can't promise too much (un-paid) support. If you want to use it, you're welcome to it – please leave the credit lines in place – I spent quite a bit of time getting this to work. And for my own curiosity, I'd love it if you came back here and posted a link to where you're using it. If you can't get it to work, you're welcome to post a question here, but I can't guarantee I'll be able to help out.

If you are using the default theme and have made modifications to it without renaming it – you may be in for a surprise when you upgrade using the new easy auto-upgrade button. Your theme will be replaced with the original one that WordPress came with. For all I know there's probably already a document/installation instruction that warns you of this fact somewhere. (I would hope anyway)

I know this may or may not apply to many people – but having just lost a bunch of changes on a site I was working on (had been tweaking the default theme to test out some stuff) I didn't realize that 1-click upgrade feature would do that.

Other than that – the new upgrade thing is awesome. Easily upgraded a bunch of other sites (that thankfully used custom named themes!) without issue and because it just a one-click upgrade – I did it much sooner than I would have if I had to download and manually upload everything.

When you use wp_list_pages() – you get a full dump of everything. If you restrict the depth, then you might not be showing the child / subpages under each page.

The code I have below will first list only the "main nav" (parent) pages. If you click on one of the main nav / (parent) pages and it has children pages – then it will list ALL subpages under that parent page (including if there are multiple parent/child pages under it – it will list all of them). So for example…

If this is your page structure:

  • Home
  • About Us
    • Who we are
    • What we do
    • Why you want to hire us
      • Our prices
      • Our people
      • Our philosopy
  • Contact Us
    • Map to our offices
    • Phone Numbers
    • Contact Form

So this would first list just the main nav items – Home, About Us, and Contact us. Like this:

  • MAIN NAV (you can change/remove this – just put it here for explanatory purposes)
    • Home
    • About Us
    • Contact Us

Once you click on About us – all the subnav under about us is revealed in a separate list below the main nav items – and will stick around for as long as you're in an "about us" page. Kind of like this:

  • MAIN NAV (you can change/remove this – just put it here for explanatory purposes)
    • Home
    • About Us
    • Contact Us
  • SUB NAV FOR: About Us
    • Who we are
    • What we do
    • Why you want to hire us
      • Our prices
      • Our people
      • Our philosopy

<ul>
<?php wp_list_pages('title_li=<h2>MAIN NAV</h2>&depth=1' ); ?>
</ul>
<?php
if ($post->post_parent == 0) {
$children = wp_list_pages("title_li=&child_of=".$post->ID."&echo=0");
$parentpage = $wpdb->get_row("SELECT ID, post_title, post_name FROM $wpdb->posts WHERE ID = '".$post->ID."'");
}
if ($post->post_parent != 0) {
$next_post_parent = $post->post_parent;
while ($next_post_parent != 0) {
$children = wp_list_pages("title_li=&child_of=".$next_post_parent."&echo=0");
$parentpage = $wpdb->get_row("SELECT ID, post_title, post_parent, post_name FROM $wpdb->posts WHERE ID = '".$next_post_parent."'");
$next_post_parent = $parentpage->post_parent;
}
}
?>
<?php if ($children) { ?>
<ul>
<li><h2>SUBNAV FOR: <a href="<?php echo get_permalink($parentpage->ID); ?>"><?php echo $parentpage->post_title; ?></a></h2>
<ul>
<?php echo $children; ?>
</ul>
</li>
</ul>
<?php } ?>

If someone knows of an easier/better way than this – please let me know. I've looked and couldn't find anything (and was happy to have figured something out that worked!)

You can put this anywhere in your template file really. This code would be used OUTSIDE of the WordPress loop…

Update: So just a bit more advanced "features" here. On my installment of this – I wanted only the first level of subnav pages visible, and then if you clicked on a subnav page that had child pages – then that list became visible. And if one of those pages had child pages – then that 3rd level of pages would be shown also (all the while keeping all the other sub nav for this section visible. When I get more time, I'll include screenshots to demonstrate what I'm talking about. In the meantime , I'm dumping the code here before I lose it again! LOL! Oh, also – I wanted to add some kind of indicator on the subnav links that showed there was navigation below it – like an + sign or something…

<script type="text/javascript" src="/js/jquery-1.3.1.min.js"></script>
<script type="text/javascript">
jQuery.noConflict();
jQuery(document).ready( function() {
jQuery('ul').parent('li').addClass("parentul");
});
</script>

That will find any unordered list that is WITHIN a list item – and apply the class "parentul" to the PARENT li item.

Then I used the following styles to hide the blocks that needed to be hidden, and show the "+" sign next to the linkts that had more subnav items below them:

#sidebar .current_page_ancestor ul,
#sidebar .current_page_item ul,
#sidebar .current_page_ancestor.current_page_parent .current_page_item ul,
#sidebar .current_page_ancestor.current_page_parent ul {
display: block;
}
#sidebar .current_page_item ul ul,
#sidebar .current_page_ancestor.current_page_parent ul ul,
#sidebar ul ul ul {
display: none;
}
#sidebar ul li,
#sidebar ul li ul li,
#sidebar ul li ul li ul li {
padding-left: 8px;
}
#sidebar ul li.parentul {
background:url(images/more.gif) 0 3px no-repeat;
}

The "more.gif" was my + sign.

Just to clarify more… Here are the screenshots:

This is the default view of wp_list_pages:

picture-11

Here is what the code above will do:

If there is no subnav pages under the section we're in – no subnav is displayed…
picture-71

picture-41
In this view, we're in the "about" section – on the "What we do" page… notice that you're seeing only the subnav pages under "about", and the pages under "why you want to hire us" are collapsed with the + sign (my "more.gif" in front of the link…

picture-5
Now we're on the "why you want to hire us" page – so the subnav under that page are revealed.

picture-8
Now we're on a subnav of a subnav … the "our prices" page under "why you want to hire us" (in the About section)

I tweaked the stylesheets a bit for these screenshots. You'll have to play with it to suit your needs. For the screenshots, I wanted to bold the section we're in in the main nav, and the subnav page, as well as the subnav page, and subnav "parent" page… Here's the styles I used to do that:

#sidebar .current_page_ancestor ul,
#sidebar .current_page_item ul,
#sidebar .current_page_ancestor.current_page_parent .current_page_item ul,
#sidebar .current_page_ancestor.current_page_parent ul {
display: block;
}
#sidebar .current_page_item ul ul,
#sidebar .current_page_ancestor.current_page_parent ul ul,
#sidebar ul ul ul {
display: none;
}
#sidebar ul li,
#sidebar ul li ul li,
#sidebar ul li ul li ul li {
padding-left: 8px;
}
#sidebar ul li.parentul {
background: none;
}
#sidebar ul ul li.parentul {
background:url(images/more.gif) 0 3px no-repeat;
}
#sidebar .current_page_parent li,
#sidebar .current_page_item li {
font-weight: normal;
}
#sidebar li.current_page_ancestor,
#sidebar li.current_page_item {
font-weight: bold;
}

10 Feb, 2009

Run WordPress Locally

Posted by: Jennifer In: Bookmarks

I spent a very frustrating evening a few nights ago trying to get MySQL installed on my Mac laptop. I never got it working. I have really been wanting to develop stuff offline just to make things easier. I have plenty of web access to work with – still it would be nice not to have to deal with FTP for everything I want to test, etc.)

Then this morning I found this tutorial – and most importantly found out about MAMP. WHY has no one ever told me about this??? Hmm?! OMG. It rocks!! They say it's one click install for mysql apache and php (apache and php were already on my mac – it was the mysql that was giving me headaches). One click was right. It ran. I installed WordPress locally without any problems. I'm a happy camper!!

In honor of "Thank a WordPress Plugin Developer" (yes, I know I'm a little late. hush!) I wanted to recognize some plugins and their developers that have made my job so much easier. (FYI – Most of these plugins are particularly helpful when using WordPress as a CMS). I know these kinds of lists have done over and over again – my purpose here in creating my own "top 10" is to save the links so I always have the ones I use the most in a handy list as well as express my personal thanks)

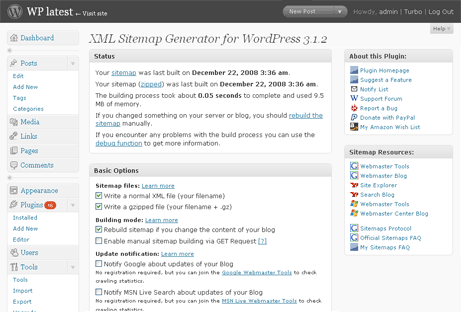
1) Google XML Sitemaps by Arne Brachold
Easily generate google friendly XML sitemaps.
screenshot-1

2) The Attached Image by Paul Robinson
I recently found this plugin and I'm kicking myself for not finding it (or realizing what it could do for me) sooner. This is perfect for when I have a layout that has an image associated with a post or page, and I need to "call it out" and have it show up somewhere outside of where the content is going. (An added thanks to Paul who added a few extra features I requested in his comments section. How cool is that!)
screenshot-1

3) Raw HTML by Janis Elsts
This has come in handy on more than one occasion. Requires viewing the page in "HTML" view only. (Last I used it, if you viewed the page in the visual editor – it would screw everything up). But still – very helpful for when you really need to have wordpress allow HTML in a post/page (and not try to "format" it for you.

4) PageMash by JoelStarnes
This is a new one I found this week in my search for a plugin to help me tame the too-many-pages WordPress CMS project. I must have done a million searches looking for page management plugins. WHY didn't that one ever come up?!? (Google – you fail me AGAIN! Let me put on my surprised face…) Anyway, this creates its own admin page to do it's magic. My one comment/complaint would be I wish it could have done the same cool stuff – but on the same page-listing admin page. But even so, I'm still thankful for this plugin. It's really going to help me out a lot.
picture-1

5) All In One SEO Pack by Semper Fi Web Design
This plugin is pretty much a no-brainer. It gives you all sorts of control for each page and post for adding keywords and descriptions and customizing the title, etc. The screenshot below is the box that will appear on your edit post or edit page view.
picture-2

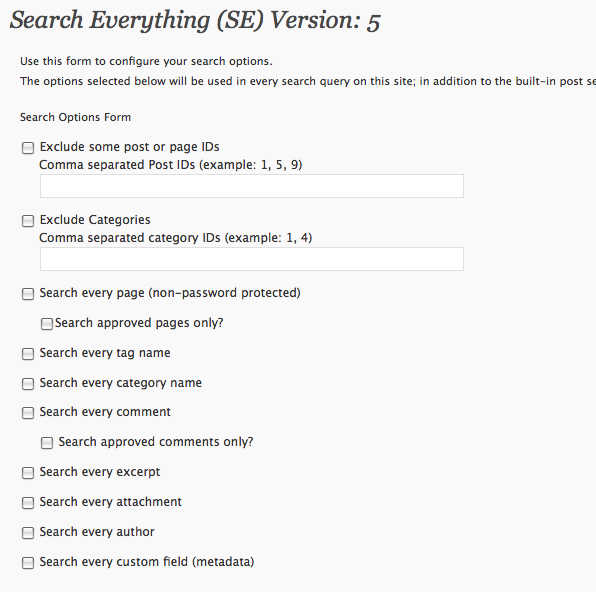
6) Search Everything by Dan Cameron
This plugin has been a huge help when I've wanted to tweak what gets searched using the WordPress search function. You can exclude categories, certain posts or pages. It's very nice!
picture-3

7) WP-PostRatings by Lester 'GaMerZ' Chan
This plugin is more for the typical blog site, but still I've used it a few times and it rocks.
picture-4

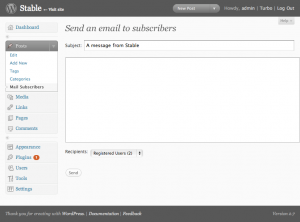
8 ) Subscribe 2 by MattyRob, Skippy, RavanH
Can be used for typical blog sites – or if you use your "posts" for "press releases" in a CMS site – this is a great way to notify people of new releases.
screenshot-1

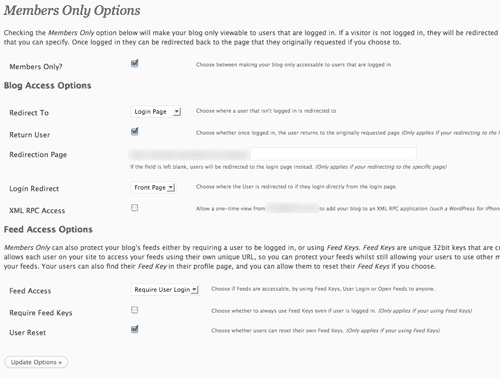
9) Members Only by Andrew Hamilton
This is an excellent plugin for when you need to have your blog restricted to registered users only.
picture-5

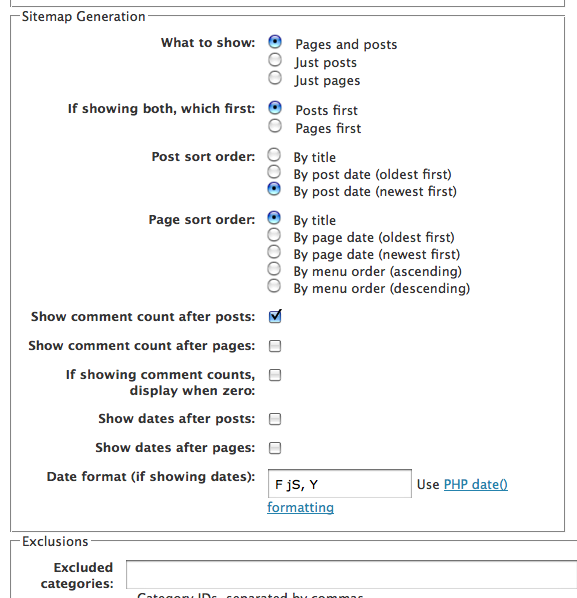
10) Sitemap Generator by Dagon Design
I had been using this plugin on a number of sites pre-2.7. I absolutely loved it, which is why I've included it here in this list. However, It seemed to work initially after the 2.7 upgrade – but would then randomly have problems and I'd have to remove it. :( So I've included it in this list anyway because of how awesome it was, and I'm hoping hoping hoping that they update it for 2.7.
picture-7

I've specifically left Akismet out of the list because, if you're going to allow comments on your blog, then using Akismet is just a given. (It also COMES with the WordPress download) So including it in a list like this is sort of a cop out. But I'm mentioning it here because it is so awesome and the developers have my complete gratitude!!

So I've discovered a new feature in WordPress 2.7 – get_search_form(). What this will do is first (for backward compatibility sake) look for a file named searchform.php in the theme directory – and if it doesn't find it then it generates the HTML for you. (=cringe=) Yeah. You just know I've gotta be overriding that.

Thankfully the function does have a filter hook. First – to understand what the function is doing – here is a link to the phpxref of the function.

So you can override this one of two ways. You can simply create a searchform.php page in your theme directory with the search form you want to use… or you can add something like the following to your functions.php file in your theme directory (or create a plugin with this, although that seems like overkill – probably a function in functions.php is fine)

function my_search_form($form) {
$form = '<form method="get" id="searchform" action="' . get_option('home') . '/" >
<div><label class="hidden" for="s">' . __('Search for:') . '</label>
<input type="text" value="' . attribute_escape(apply_filters('the_search_query', get_search_query())) . '" name="s" id="s" />
<input type="submit" id="searchsubmit" value="'.attribute_escape(__('Search')).'" />
</div>
</form>';
return $form;
}
add_filter('get_search_form', 'my_search_form');

The above value of "$form" is the same HTML that WordPress' get_search_form() will spit out. And it has some nice things in it (like pre-populating the search field with the last query requested). So you can start modifying it from there as you need to (ie. removing or changing "Search for" etc.

From a performance standpoint – I'm not sure which would be better – creating the searchform.php or making use of the get_search_form filter. (or is it negligible?)

01 Feb, 2009

jQuery Side Scroll

Posted by: Jennifer In: jquery

(This post has been almost completely re-written. Usually I don't that – but I thought it would be more confusing to have all the changes, strikeouts, etc.)

For a project I'm going to be working on, I needed to create a navigation piece that had different panes scrolling/sliding in from the right depending on what item you clicked. I've seen lots of options for vertical accordions. Not as many, but a few, options for horizontal accordions. My situation was unique in that the click was not near or part of the scrolling panes. And it should disappear completely out of view if not the current pane so that if clicked again, it would again animate in. But if already in view – I wanted it to stay until the new pane coming in covered it completely.

Went through a few versions of this, and finally I have something I'm satisfied with. Here's the demo.

View source on that page to see the full html and jquery code. Now I'll walk you through what my logic was…

var lastpane;
var href;
var zcount = 2;
var inprogress = false;

That's just calling out some variables we'll be using in various iterations. "href" will be used to hold a reference to the current element/pane. "zcount" will make sure the current pane always has the highest z-index. "inprogress" will keep track of whether there is currently a pane being animated or not and will hold the other clicks/animations until the current pane animation is complete

$('a').click(function(){

Obviously, if this gets used in something other than a proof of concept, you'll probably have to be more specific about WHICH 'a' – ie – give the links you want to use for this a style like class="paneslider" and then change that to $('a.paneslider')… etc. In any case, the above just says, run the following whenever a link is clicked.

if (!inprogress && $(this).attr('title') != lastpane) {

Here I'm checking to make sure that an animation isn't already in progress, and the currently clicked link does not match the pane currently in view. (Which would have been defined as "lastpane"

inprogress = true;
zcount = zcount+1;

Set in progress to true right away so that we don't have conflicting animations. And add 1 to zcount (z-index), which will make the current pane appear above any other that is visible.

$(lastpane).css("z-index","1");

Give the last element pane shown (defined as "lastpane") a z-index of 1 to make sure it appears below the pane we want to have move across the screen.

var href = $(this).attr('href');

Now we'll redefine href as the current pane we want to animate. (This, by the way is set in the html – in the "a" tag using the "title" attribute).

$(href).css("left","800px");
$(href).css("z-index",zcount);

Make sure that the current pane is starting out completely out of view, and then giving it the highest z-index.

$(href).animate({"left": "0"}, 2000, function() {

Now we start our animation. Move it across to absolute position of 0 in 2000 milliseconds. As well we use a callback function to do the following after the pane finished moving.

$(lastpane).css("left","800px");
lastpane = href;
inprogress = false;

We move the pane that is now hidden under the current pane back to the "starting" position – and then we redefine "lastpane" with the pane that is now currently visible. And now that everything else is done, "inprogress" gets set back to false so we're open to run another pane across.

Then the rest of the code is all closing brackets etc.

Just for fun, I have another version of the sliding pane thing using the "easing plugin". Here's the demo using a bounce as it comes in.

Featured Sponsors

Genesis Framework for WordPress

Advertise Here


  • Scott: Just moved changed the site URL as WP's installed in a subfolder. Cookie clearance worked for me. Thanks!
  • Stephen Lareau: Hi great blog thanks. Just thought I would add that it helps to put target = like this:1-800-555-1212 and
  • Cord Blomquist: Jennifer, you may want to check out tp2wp.com, a new service my company just launched that converts TypePad and Movable Type export files into WordPre

About


Advertisements